Deconstructing a state channel application
May 22, 2020
Last time we introduced the concept of a state channel application, showing how you could add custom logic to state channel transitions. In this week’s post we’re going to be digging into this some more by looking at a real life state channel application.
The application we’re going to be looking at is the popular, and highly exciting, game of rock-paper-scissors (RPS). It’s an interesting example to look at, as it’s simple enough to understand, while also involving some rich state evolution logic, as well the commit-reveal pattern that will likely be important in many state channel applications. To give you a quick idea of the app, here’s a bonus gif:

Alternatively you can have a go yourself here.
States and incentives
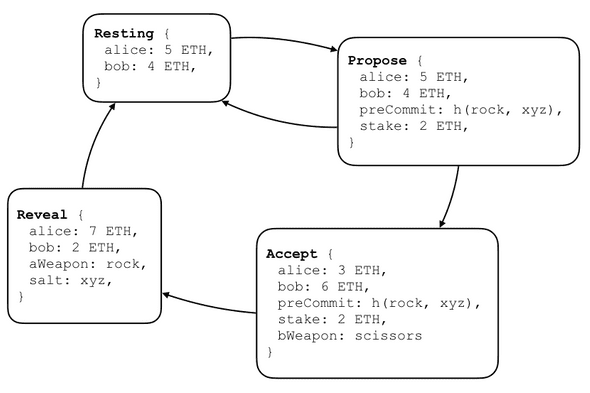
The first step in understanding at app like this is to understand the underlying states. A round of RPS contains 4 different states:
The game starts with both players in the Resting state. Alice then proposes a round by
signing a Propose state, and sending it to Bob. The state includes the stake they will
be playing for, and a pre-commitment to Alice’s choice of weapon (in this case ‘rock’).
Bob then has a choice whether to decline the game by returning to the Resting state, or
accept the game by signing the Accept state. If he accepts, he specifies his choice of
weapon. The final step is for Alice to reveal her choice, and with it the winner, by
signing the Reveal step. As you’ll see in the app definition contract section below, the
transition rules at each stage ensure that the players play according to the rules (for
example, the Accept -> Reveal step is only valid if the revealed move matches the
pre-commitment, and so on).
We have to be a little bit careful with the incentives during the commit reveal stage, as if the state channel interaction breaks down (e.g. because one party stops responding), then the current outcome will be finalized on-chain. We therefore have to ensure that the outcome obtainable on-chain at each step doesn’t incentivize the party whose turn it is to stop playing.
The danger point in RPS is the reveal step. The moment Alice sends the Accept state, Bob
knows whether or not he has won. We need to make sure that he is still incentivized to
continue even if he has lost. The way we do this is set the outcome on the Accept state
to be as though Bob has lost the round. This means that there is no advantage to Bob from
stopping, so he might as well continue.
App definition contract
Once we’ve designed the underlying states and incentives, the next step is to encode the logic in a smart contract in a form that can be read by the state channel adjudicator. In order to do this, the contract must conform to the force-move app interface:
interface ForceMoveApp {
  struct VariablePart {
    bytes outcome;
    bytes appData;
  }

  function validTransition(
    VariablePart calldata a,
    VariablePart calldata b,
    uint256 turnNumB,
    uint256 nParticipants
  ) external pure returns (bool);
}
The eagle-eyed amongst you might have noticed that this is slightly different to the
interface we discussed last week, when we had validTransition(State s1, State s2). The
version you see above is a gas-optimized version, where we’ve stripped out some
unimportant parts of the state, and de-duplicated the turnNum and nParticipants.
The first part of writing the application contract is to define the
state format,
along with a function to deserialize the appData bytes into this format:
enum PositionType {Start, RoundProposed, RoundAccepted, Reveal}
enum Weapon {Rock, Paper, Scissors}

struct RPSData {
  PositionType positionType;
  uint256 stake;     // the amount each player contributes to the round
  bytes32 preCommit; // keccak(aWeapon, salt)
  Weapon aWeapon;    // player a's weapon
  Weapon bWeapon;    // player b's weapon
  bytes32 salt;
}

function appData(bytes memory appDataBytes) internal pure returns (RPSData memory) {
    return abi.decode(appDataBytes, (RPSData));
}
Although not all states make use of all of the properties, we go for the simple approach here of including all properties in the struct, and leaving them empty when unused. We’re using solidity’s new, but no-longer-experimental, abi-encode functionality, which makes working with state channel states much nicer that before!
Finally, we define the validTransition function itself:
function validTransition(
  VariablePart memory fromPart,
  VariablePart memory toPart,
  uint256, /* turnNumB */
  uint256  /* nParticipants */
) public pure returns (bool) {
  // ... body omitted ...
}
The full code here is fairly straighforward, but too long to go through line-by-line here. If you’re interested, check it out!
Working with a state channel wallet
Now that the app definition contract is sorted, the next task is to craft a web application capable of allowing users to run the state channel application. On the face of it, this seems quite involved. Here are some things that need to be covered:
- providing the UI to allow the user to pick their moves
- crafting the appropriate states based on the user’s choices
- signing these states and sending them to the opponent
- storing any states that have been sent or received
- running the protocols to open/fund/close/defund a channel
- running the protocol to launch a challenge, if required
- monitoring the chain, and responding to challenges
Let’s focus on just the ‘signing states’ part above, to appreciate the challenge here. Signing data is a common part of basically every Ethereum application, and there’s a well established pattern for doing this: you send the data/transaction to your eth wallet (e.g. MetaMask), which prompts the user for permission, and then signs. It’s not hard to see that this isn’t going to be much use for state channels. The whole point of state channels is to be able to transact at speed, with multiple updates every second. This isn’t going to work if every signature has to be approved with a user-click. Moreover, without bespoke tools, it’s very hard for users to understand whether the chunk of data is safe for them to sign.
It seems that, in order to run state channel applications, the user needs a wallet capable of interpreting state channel states, to the extent where the wallet can auto-sign states on behalf of the user in certain situations. In the future regular Eth wallets will have these abilities, but for the time being we need a special state channel wallet to handle them.
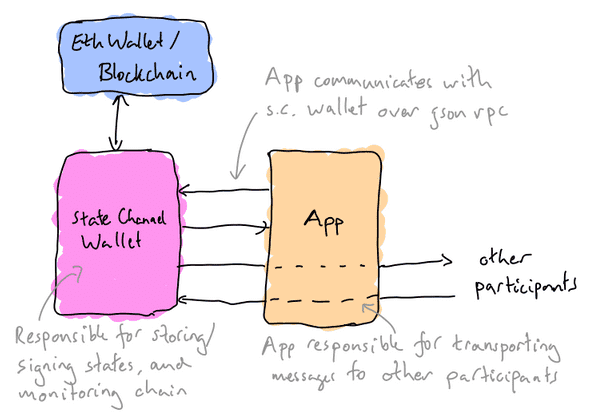
As well as auto-signing transactions, the app can offload a lot of the state-channel-specific responsibilities onto the state channel wallet. In the list above, the state channel wallet can take on 3-7, leaving the app responsible for the UI and crafting the app-dependent states.
The state channel wallet stores the keys used for signing state channel updates, but reaches out to the Ethereum wallet when blockchain transactions are required. The user grants the state channel wallet permission to sign states for a given application on their behalf. The permissions here can be fine-grained, e.g. allowing the user to place limits on the total budget / rate of spend etc.
The app is responsible for relaying messages to the other participants in the channel. This gives the app developer flexibility, allowing them to pick a transport layer that meets the performance requirements for the application. This also opens up the possibility of including state channel states inside existing messages, for example as a custom header on an http request.
In the RPS demo app, the state channel wallet is embedded on the page in an iframe, meaning that the user doesn’t need to install any software separately. This approach has some downsides in terms of safety and reliability, as both the state channel signing key and states are stored in local storage, but represents a resonable tradeoff, allowing for a good onboarding flow. As users begin to use state channels more heavily, they will likely want to install a dedicated state channel wallet application.
Application design patterns
Even with the channel wallet managing signing, storing, and state channel protocols, we still need to be careful tracking the state channel’s state in the app itself. This makes sense: the channel wallet can only check whether states are a valid transition; it doesn’t know anything about the meaning of the app data, or how to construct new states from a given position.
A useful pattern seems to be to cache the current state of the state channel inside the application itself. It’s then very natural to design the application in state-machine style, based largely off the current state of the channel. For common applications such as payments, a bespoke ‘channel app client’ can be provided by the contract developers to remove this responsibility from the app developers and allow for a more ‘drop in solution’ dev experience.
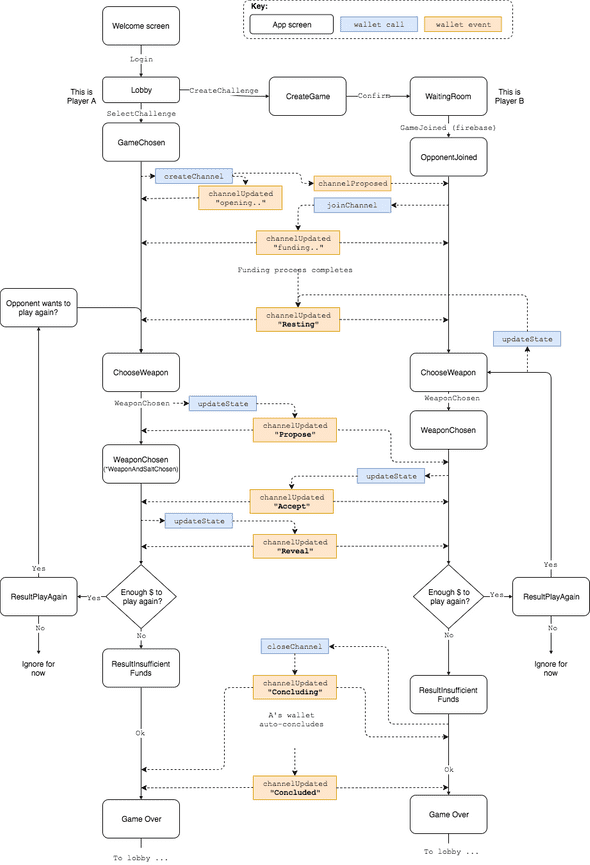
The RPS app in this post is based around the following state machine. You’ll notice that we put a fair amount of effort into obscuring the underlying differences between the players that exists in the state diagram, to give a uniform playing experience for the players:
This diagram is pretty involved, but hopefully also fairly self-explanatory. You should get an idea of how an application developer interacts with a state channel wallet, and how to design an application that handles both user input and state channel updates triggered by an opponent.
Next Time
In our next post, we’ll be returning to the core state channel protocol, looking at the optimized version of the adjudicator, and how we used a formal verification tool called TLA+ to find and fix security holes in the protocol layer. See you then!
Written by Tom Close, Magmo team lead @ Consensys R&D


